Wednesday, September 30, 2009

halloween '09

these pictures inspired my halloween decorations this year.


--------

here's what i did


i traded my summer pillows for black ones, framed some cut out bats in extra frames i had around. i took a branch from outside, spray painted it black and bought a crow on clearance at michael's. wal-mart has cheesecloth for sale by the yard so you can do a spooky cover like the couch in the first picture.

--------


hAvE A FuN ocToBEr

Monday, September 28, 2009

william's quilt


one very good friend of mine, katelyn, taught me how to make my first quilt. she has amazing talent for quilting and i'm very lucky to of had such a privilege.

 
to start, i picked out 9 different fat quarters from a local fabric store here in moscow, quilt something. flannel for the back and some warm & cozy for added warmth. i chose coordinating fabric for the binding and thread to hand quilt it. that's pretty much it.


i wanted a random pattern but you can choose any one you'd like. here it is all laid out ready to sew.


i've just layered the warm & cozy in between the flannel and squares with spray adhesive. katelyn showed me how to do most every step, but now after completing it i'm pretty confident in doing one on my own. thank you kate.


finished blanket

here is the back flannel with binding.

you can see the hand stitching up close here.

----------

fiy - total cost around $45 

Wednesday, September 23, 2009

diy picture frames and mat board


this wall has been empty for quite a while and sadly i've never had many pictures of my sweet little boy up anywhere. i knew it was long over due, so here's what i did.

bought 7 frames from salvation army for around $5.00 and painted them white.

borrowed a mat cutter, which costs $15 - $25 i imagine, from my father-in-law. cut mat board, $8.00 at printshop in the mall, from 3'x4' size to fit each individual frame. 


marked where to cut opening. cut. 

taped pictures in place so the back of each frame looked about like this. 


here they are hung up. i'm not loving the positioning of them right now, but i'm happy to see the space taken up with something.

---------

Tuesday, September 22, 2009

for little madison


i am blessed with good friends, really good friends infact.

rigby, as i like to call her, is one of them, and she just had a baby girl.
the flower mobile i posted earlier is her gift. today i made a card so rigby could write her sweet baby a note, telling her how special and loved she is. 

----------

i sewed fabric onto card stock, glued on an 'm' that i traced onto a different fabric. hand sewed a button and loop to keep closed. simple & easy.  

front

back


---------


Sunday, September 20, 2009

good buys


i love yard sales, garage sales, thrift stores and craigslist. this saturday i went to a few yard sales and bought these lamps for $10.00. i plan to make them look something like...


this.


what do you think?


----------

Tuesday, September 8, 2009

flower mobile


this is the second mobile i've made. the first was for katelyn and this one is for my friend camille, she'll be having a little girl soon. these are very inexpensive, fun and easy to make, a little time consuming but worth it. 


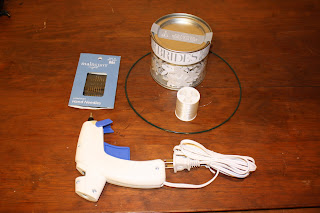
supplies:


glue gun
sewing needle
clear, strong tread
BRIDES flowers - Micheals $4.99
metal ring - Micheals

 here are the finished strands laid out on my table (17 total)


finished product

-----------

to start, you thread your needle and pierce each flower in the center, until you reach the length desired. this one was 12 flowers and 15 flowers long. then put a dot of glue at the bottom of each pierced flower and hold in place, about 1.5'' from each other. after you've finished all the strands you then tie each one to the metal ring and use your glue gun to hold in place.